Build-a-bed
This is a series. READ the other posts at the following links (especially before you post that you don't understand why we did this!):
Where's the storage?
Some of the unforgiving people reading Ikeahackers will want to see the pictures in this post. I have posted pictures of the next phase of construction, storage.
Shelves
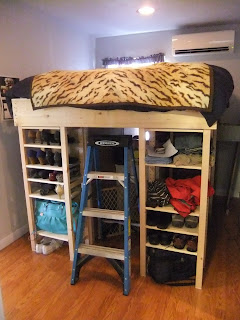
Well, like I said in the 3rd (tutorial) post, the project is still unfinished. We have, however added a few shelves to the ends in the small Ivar.
 |
| End (small Ivar) shelving and roll out hanging storage |
This is self explanatory, if indeed you decide to build one of these. Obviously, shelve as needed.
As you can see in the picture, there is an additional large Ivar unit in the middle section. We added wheels (purchased at Ikea) to this unit so that it could be moved in and out as needed. This works with the current ladder we use (a normal fold-up model) because both are mobile.
Pictured below are the setup with the ladder, her, and his side shelves.
 |
| This is just about the best view of the bed that I can take because of the room size. |
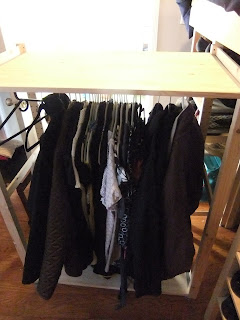
Rolling Hanging Storage
We needed something to hang clothes on in the middle section, but we also needed it to be accessible. This is the solution my husband found. He took a large Ivar and cut off about 4 inches from the bottom of the sides. Then he screwed the casters on. Notice that he could only use 2 screws because of size difference
To complete the structure we needed 2 shelves, the cross braces, and a Grundtal rack from the kitchen section. We had some left over craft wood to put in between the Grundtal and Ivar shelf so that hangers could fit at a normal angle.
The hanging structure moves quite nicely in and out, but I mentioned that I didn't want to bend over to get the thing in and out. I am 5 months pregnant and getting more so by the day; bending over is an issue for me. I suggested a pully system that would allow us to move it both in and out. We have yet to work it out.
Malms
We installed 3 of the 4 Malm chests, but because of the size of the room, it is impossible to get a view of what they look like. I did my best to give an idea of how they work despite the room size. I am showing my side, but B-chan's side is identical, opening to the right.
While they cannot be accessed from the front, they are not completely useless. We have just enough room to get to them. As it is, I cannot get between the wall and the bed because of my growing belly, so I have my husband do it for me.
Still not finished!
Yes, we are still working on this. I have mentioned before that we need a better solution to the ladder. We need it to be stored within the structure of the bed. Now that we have worked out the hanging storage, we need a way to get it in and out. B-chan is currently pondering a pully system.
Stay tuned for Part 6.


Is this your bed? I looks very high. Are you sleeping on it now? I am curious how it is working out.
ReplyDeleteYes, this is our bed. Yes, it is high. At the moment, it is a bit awkward because I am 6 months pregnant (and slightly terrified that I will somehow fall off). As is posted in the related entries, the ladder is a temporary solution to getting up and down. The mall room also makes it very easy to bump one's head on the ceiling and the like.
DeleteAwkward as it is, it actually serves us well because there is minimal storage in our 1940's cottage even with the add on.
I think my favorite part is the slide out "closet". Admittedly, it would be easier without said bun in the oven.
I appreciate the work you've done but I'm afraid I don't understand why anyone would build such a bed. Why not buy a simple bunk bed (one single bed on the upper level, one single bed on the lower level) and use it instead of a queen size bed? Bunk bed would be so simple, no need to do any 'hacks' on it. Bunk bed would also save a lot of space. You could place the bed right next to a wall (long side against the wall) and use the remaining floor for other purposes. There would be enough space left to install a large IKEA Pax wardrobe that would cover the opposite wall from end to end. Considering that your family is growing (you are pregnant) it would have been wise to go for the bunk bed. Husband could sleep on the upper level because he can climb up there easily. You could sleep on the lower level and be safe (no fear of falling). The bunk bed could even be given to your children later.
ReplyDeleteFirst, I want to thank you for your comment. I would encourage you to read all the posts linked in this series.
DeleteSecond, I would like to direct your attention back to the pictures above, specifically the one that shows that there is barely enough room to open the drawers as it is. Why did we use a queen bed? We already had it! Our house has three rooms, including the living room. There was nowhere else to sleep and we already bought a bunk bed for our children. Since son sleeps in the bunk bed and our daughter sleeps in the crib, the only place for our bed is in the small room. The existing closet is 2 ft wide.
The other issue is storage. our closets are barely wider than the shelves at the end of the bed. Even if we could fit the Pax into the room, we would not be able to use it or the drawers under the bed.
As for climbing into bed, it is the only place I can comfortably sleep in the house. At nine months pregnant sleeping was hard enough. I would not be denied much needed sleep so I chose to be comfortable.
As I stated, it works for us in our situation. We have the option of returning to our normal height queen size bed, too because we used some parts of the frame. If you do not like it, do not copy it. You can find an idea that works for you. For us, it works. I chose to share the idea just in case there was someone else out there in the world that might be in a similar situation with space and budget.
Please use discretion when responding on another person's personal site, especially if you have not visited in person and considered everything relevant to the situation.